

Who Grow tomatoes upside down in a bucket wants to know the annoyance: As soon as the bucket is hanging, the earth in it dries out in record time during the first heat wave. The trick that most people miss is right where no one is looking – on the exposed top of the bucket. This area is almost always fallow, and it determines whether your plant survives the summer or dies.
In this article you will read why the top is so important, when mulch is enough and when real planting is worthwhile – including varieties, weight and an honest watering rule of thumb.
In short
- Use the top – A thin layer of mulch made from grass clippings or a flat planting slows down evaporation and keeps the soil moist noticeably longer.
- Mulch or plant – Grass cuttings are a quick solution; planting with sedum or herbs permanently shades the soil and brings additional benefits.
- No replacement for casting – The trick reduces drying out, but does not replace regular watering on hot days.
Why tomatoes in buckets upside down are so popular
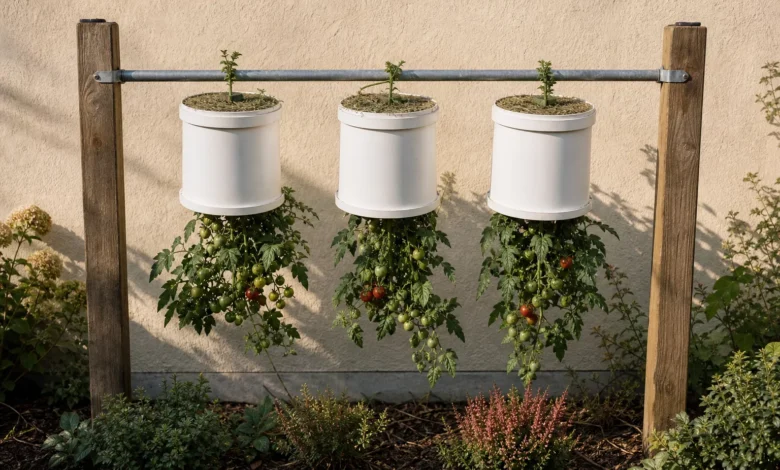
The idea is impressively simple: a plastic bucket has a hole in the bottom, the young tomato is threaded through this hole from the inside and then grows upside down. Suspended from a sturdy crossbar, a hook or a shepherd’s crook, the plant hangs freely in the air and carries its fruit downwards.
The biggest advantage is the space gained. On a narrow balcony or in a tiny terraced house garden, the tomato grows where nothing else fits – in the air. There is also a hygienic side effect: Because the leaves have no contact with the ground, soil-borne diseases such as the dreaded late blight or nematode infestation are less common. Snail damage also practically no longer plays a role upside down.
There is a catch, however, and it’s called water. A bucket only holds a few liters of soil, is exposed to air all around and heats up more in the sun than a bed. The result: The soil dries out much faster than you are used to in the garden. This is exactly where the topside trick comes in.
The empty top problem
If you turn the bucket over, its former opening now faces upwards – an open, usually circular area of earth about 25 to 30 centimeters in diameter. In practice, this area almost always remains empty. And empty earth in the blazing sun is an evaporation engine.
Bare earth’s surface loses moisture in two ways: the sun dries out the top layer directly, and the wind continually carries away the evaporated moisture. Added to this are the temperature fluctuations. During the day the sun beats down on the dark earth, but at night it cools down significantly. This stress slows down root growth and thus the entire plant.
However, if you cover or plant the top, you will cut off most of this evaporation. The soil stays cooler, more evenly moist and the tomato puts less energy into simply surviving.

Two ways to put the top to good use
There are two proven approaches. Which one is better depends on how much effort you want to invest and whether you want to use the additional space.
Way 1: Mulch with grass clippings. The quick version. A one to two centimeter thin layer of fresh or slightly dried grass clippings goes directly onto the soil. This brings three advantages at once:
- It slows down evaporation and keeps the soil moist for longer.
- It keeps the top layer of soil loose rather than crusting in the sun.
- As the grass clippings slowly decompose, they release nutrients into the soil.
Important: Apply the cut really thinly. A thick, wet mat of grass begins to rot and smell. It is better to add a small handful more often as soon as the old layer has rotted away.
Way 2: Actively plant the top. The slightly more effective way. Instead of just covering it, plant shallow-rooted plants on the area. They permanently shade the earth with their foliage, keep it stable via the roots and, on top of that, look beautiful. The only compromise: These housemates need a little water and nutrients themselves – with vigorous watering this hardly matters.
Sedum, herbs and flowers for the top
It is crucial that the subtenants have shallow roots and can tolerate both sun and drought. The bucket offers little depth and is usually in full sun.
- Sedum (creeping stonecrop): the classic. Easy to care for, extremely drought tolerant, shallow roots – it thrives even if you forget to water it.
- Calibrachoa (magic bells): the decorative choice. Blooms all summer, loves the sun and makes the bucket look really pretty.
- Edible herbs: Basil, marjoram or mountain savory. They like the same sun as tomatoes and also provide a kitchen harvest – basil and tomatoes are a well-rehearsed duo on the plate anyway.
A trick from the editors: If you plant herbs above, you should choose a strong-growing basil and harvest it regularly. This way it stays compact and doesn’t take anything away from the tomato underneath.

Material and implementation step by step
The assembly was completed in one afternoon. You don’t need much, and you probably already have a lot.
What belongs in the set: a sturdy plastic bucket with 18 to 20 liters, nutrient-rich tomato soil, a strong young plant seedling, some coconut mat or garden fleece for the inner lining and a secure hanging device.

How to proceed:
- Cut hole: Cut a hole about five centimeters in diameter in the middle of the bottom of the bucket.
- Lining: Line the floor inside with a coconut mat or a piece of fleece. This keeps the soil in the bucket while allowing the plant to pass through.
- Thread the plant: Carefully guide the seedling down through the hole from the inside so that the root ball remains in the bucket and the shoot tip hangs outside.
- Fill: Fill the bucket about three-quarters full with nutrient-rich soil. The edge remains free so that there is room for mulch or plants on top.
- Hanging: Hang the bucket on a really sturdy holder – more on that in a moment.
It’s worth making a conscious choice when it comes to the variety. Small-fruited varieties, i.e. cherry and cocktail tomatoes, are ideal for the upside down method: they bear more easily, break less often in wind and cope better with the limited root space than large beefsteak tomatoes. Our tried and tested home remedies for healthy tomatoes show you how to get more out of your plants. If your plant produces a lot of leaves but no roots, the article Why Tomatoes Don’t Bloom will help.
Pro tips
- Watering rule of thumb: Check morning and evening on hot summer days; If you stick your finger two centimeters deep into dry soil, it will be watered. Daily watering is normal during hot periods.
- Taking weight seriously: A planted and freshly watered 20 liter bucket quickly weighs 15 to 25 kilograms. Choose hooks, rods and wall mounts that are appropriately stable – the weight increases over the season.
- Evenly instead of a lot: It is better to water moderate amounts regularly than to overwater infrequently. Changing from bone dry to soaking wet encourages the fruit to burst open.
- Keep mulch thin: Apply only one to two centimeters of grass clippings and add more after they have decomposed – thick wet layers will rot.
- Don’t forget fertilizer: The small supply of soil is quickly depleted. After flowering, add tomato fertilizer every one to two weeks, such as home-made calcium fertilizer for tomatoes.
Conclusion
The top of the bucket is not a decorative detail, but your best ally against drying out soil. Whether you use a quick mulch layer of grass clippings or plant the area with sedum, herbs and magic bells – both ways keep the soil cooler and moister and relieve the plant of heat stress. Combined with a small-fruited variety, a stable suspension and regular watering, you can harvest aromatic tomatoes even in the smallest of spaces. If you want to extend the season, you will find suggestions on how to extend the tomato harvest into autumn.
Frequently asked questions
How often does an upside down tomato bucket need to be watered?
That depends heavily on the weather. On normal summer days, once a day is usually enough; on hot, windy days it may be necessary in the morning and evening. Check with your finger: If the soil is two centimeters dry, water it. The small reserve of earth does not forgive prolonged forgetting.
What plants are best for the top of the bucket?
Shallow-rooted, sun- and drought-tolerant species. Sedum (creeping sedum) is the easiest to care for, Calibrachoa is the most decorative. If you want to use the area, plant edible herbs such as basil, marjoram or mountain savory.
How heavy will a planted tomato bucket be and how do I hang it safely?
A fully planted, freshly watered 20 liter bucket weighs around 15 to 25 kilograms – and tends to get heavier over the season. Use a solid crossbar, a sturdy shepherd’s crook or a firmly doweled wall bracket and check the attachment regularly.
Does mulching or planting replace regular watering?
No. Both methods slow down evaporation and keep the soil moist for longer, so they reduce the amount of watering. Especially on hot days, you can’t avoid regular watering.