
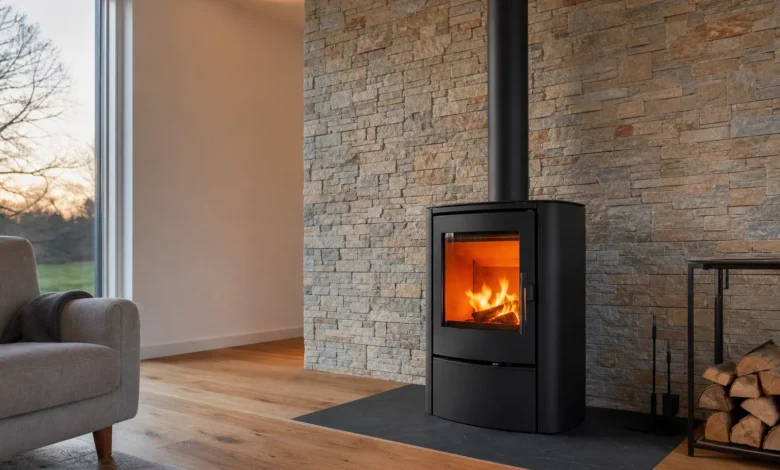

One Lay the stone wall behind the fireplace yourself You can quickly save several hundred euros in craftsman’s costs – and can be easily done on a free weekend if you choose the right material. Gluing clinker brick slips, screwing stone tiles or a cheap wallpaper solution for your rented apartment? This article shows you which stone look is suitable for beginners, how much mortar you need to plan for and where the borderline to a specialist company is.
One thing in advance: Before you reach for the trowel, clarify the distance between the oven and the wall. We have explained separately how much space your model actually needs and which materials are heat-resistant – read there to find out what safety distance your fireplace needs from the wall. This is about the practical side: laying.
In short
- Choose material according to ability – thin clinker brick strips stick more easily than heavy natural stone slabs; Stone tiles for screwing are the most forgiving of beginners’ mistakes.
- Calculate mortar correctly – only use heat-resistant adhesive and grout, rule of thumb around 10 kg for 3 m², check the exact amount at the hardware store.
- Rental apartment alternative – Fireproof non-woven wallpaper with a stone look is significantly cheaper and can be removed later with less residue than tiles.
Which material is suitable for DIY?
Not every stone look is equally beginner-friendly. The effort increases with the weight and irregularity of the material – and that’s exactly what you should base your choice on.
Clinker brick slips: the easiest way to get started
Brick slips are basically thin slices of clinker brick, only a few millimeters to a good centimeter thick. They are light, hardly bulky and can be stuck on almost like large tiles. This is a double advantage for the narrow area behind the oven: you don’t lose any space and you don’t have to weigh heavy chunks against the wall. Anyone who is laying a stone wall for the first time is most relaxed with brick slips.
Solid stone slabs: something for experienced hands
Natural stone solid slabs look fantastic, but weigh a lot. You need a stable surface, careful pressing and patience when aligning. If a thick slab slips in fresh mortar, pull the neighbors along with it. Feasible for weekend DIY enthusiasts with some experience, but a size too big for the very first attempt.
Stone tiles for screwing: forgiving for beginners
An underestimated variant: stone tiles that are screwed with dowels instead of glued. The charm is that you don’t have to touch anything and juggle the wet mortar. The screw points then disappear under the grout and only the stone look remains visible. Especially if you feel unsure about glue and timing, this is a very good-natured way to go.

Step by step: lay the stone wall behind the fireplace yourself
Half the battle is preparation. If you plan carefully, you cut less later and don’t waste any material.
First, mark the area to be covered and tape the edges with paper tape. This gives you a clean edge and protects the adjacent wall from mortar residue. Lay the panels or strips dry on the floor beforehand – this way you can immediately see how the pattern comes together.
Consciously plan the slab size so that as few stones as possible have to be cut. Each cut takes time and carries the risk of a panel breaking. Ideally, start at the bottom in a corner and work your way up in rows. Whole stones belong in the visible middle, cut stones at the edges.
A detail for the rustic look: With irregular natural stone, the edges do not have to be dead straight. Feel free to let individual stones protrude slightly beyond the adhesive tape and only remove the tape after it has dried. This means that the edge appears to have grown naturally instead of being drawn along the ruler. The principle of dry lay-out and clean edges also applies to self-assembly wall panels.

Material and tools: What you really need
This is where it is decided whether the wall will last permanently – because the conditions behind the oven are different than in the rest of the room.
First things first: use exclusively heat-resistant adhesive and joint mortar. Normal tile mortar from the standard shelf is not designed for long-term heat next to the fireplace and can crack or loosen over time. The technical term you ask about at the hardware store is fireproof or heat-resistant adhesive mortar.
A rough rule of thumb when it comes to quantity: calculate around 10 kilograms – around two standard sacks – for three square meters of space. This is a guideline; the exact amount depends on the teeth, substrate and joint width. A trick from the editorial team: Take your wall dimensions and the product you have chosen with you to the advice desk and have the quantity calculated for the specific project. Buying more in the middle of publishing is the most common time waster. While you’re there, it’s worth taking a look at what you should look out for when buying tiles at the hardware store.
When it comes to cutting stone slabs or tiles, there is hardly any way around a diamond disc. Without practice, slabs easily break away when cutting – practice on a leftover piece before working on the visible stones. If you use the screw version, you will also need suitable dowels and a drill for your wall substrate. Work gloves and safety glasses are required when cutting, no discussion.

Cheap alternative without tiles: fireproof wallpaper
Not everyone is allowed or wants to tile the wall extensively – especially in a rented apartment. There is a much cheaper solution for this: fireproof wallpaper with a stone look.
Rely on fleece. Fleece is considered difficult to ignite and is therefore a safer choice than classic paper wallpaper around the fireplace. The stone look of modern non-woven wallpaper comes surprisingly close to a real brick wall, but costs a fraction and can usually be removed later dry and with little residue – a real argument if the apartment doesn’t belong to you.
A point that many people overlook: It’s not just the stove body that radiates heat, but also the stove pipe. If it is close to the wallpapered wall, the wallpaper will receive the most heat there. A double-walled stovepipe noticeably reduces this radiation and thus protects the wallpaper. The same applies here: A safe distance from the oven remains mandatory, no matter how flame-retardant the material is advertised to be.
Pro tips
- Chimney sweep first: Before starting construction, speak to your district chimney sweep – he will know the specifications for your stove and will save you expensive dismantling.
- Leftover piece for practice: Test the diamond blade on a scrap slab before cutting the visible stones.
- Recognize limit: If you have thick natural stone slabs, lots of irregular corners or if cutting them to size is too much for you, call in a specialist company – wasted material is more expensive than an hour’s worth of craftsmen.
- Last joints: Only grout when the adhesive mortar has completely dried, otherwise the fresh row will shift.
Frequently asked questions
Which mortar is suitable for a stone wall behind the fireplace?
Only heat-resistant, fireproof adhesive and joint mortar. Normal tile mortar cannot withstand the constant heat next to the oven in the long term. Ask the hardware store specifically for heat-resistant adhesive mortar and suitable joint mortar.
Can I stick clinker brick slips behind the fireplace myself?
Yes, straps are the most beginner-friendly option. They are thin and light and can be glued in a similar way to tiles. It is important to prepare properly, use heat-resistant mortar and maintain a safe distance from the oven.
How much mortar do I need for a 3 m² stone wall?
A rough guideline is around 10 kilograms, i.e. around two bags, for three square meters. The exact requirement depends on the surface, teeth and joint width – have the hardware store calculate the amount for your specific project.
Is fireproof wallpaper a safe alternative to stone tiles?
A non-woven wallpaper with a stone look is difficult to ignite and is therefore well suited around the stove, especially as a cheap rental apartment solution. The safety distance is still mandatory, and a double-walled stovepipe also protects the wallpaper.