


REWIND creates space: There are many mounting brackets for Macs. To simply banish the Apple computer under the table top or another inconspicuous place, a simple holding frame for a few euros is sufficient. Here is a short experience report.
Mac Studio and Mac mini (especially since the mini M4) are not only extremely efficient and powerful computers, they are also comparatively small. Gone are the days of large metal cabinets for plug-in cards and rattling drives, which allowed individual components to be replaced and upgraded if necessary, but which took up a lot of space, were often unpleasantly loud and ultimately had to be replaced in their entirety every few years. Anyone who has adjusted their mind-set and worked with Mac Studio or mini for a while will hardly miss the days of large tower computers. – Apart from a few special cases perhaps.
The compact housings of modern Macs with Apple Silicon also mean a lot of space in the workplace. But sometimes you just want more space. Or you just want to completely banish the computer hardware from view. If you don’t have to constantly access the Mac’s interfaces, you can mount the computer hidden using a suitable holder. Be it under the table top, behind a shelf or even behind the monitor or television.


The use case
I currently use a Mac Studio M1 Ultra on the desktop for daily work and a Mac mini M4 as a dedicated Roon Server on the media shelf – a lowboard that also holds other components. There is constant fluctuation in both places due to my professional activities. New components from different areas are constantly coming in for testing, sometimes larger and sometimes smaller. Sometimes there are more, sometimes fewer devices at the same time. This occasionally creates a space problem both on the desktop and in the media area. Every square inch of available floor space can help.
But space is only sometimes a hurdle. As a rule, there is enough air. For simple optical reasons, I had been toying with the idea of banishing the Mac mini, but perhaps also the Studio, from my sight for a while. Since its purchase (see test report here), the Mini, which primarily works as a Roon server, has been operating as a “black box” 24/7, absolutely reliably and unobtrusively. Inaudibly quiet and fast, extremely energy efficient and with regular (security) updates, I hardly ever touch it. So it doesn’t necessarily have to be directly accessible on the lowboard. (If necessary, the Mini is almost always managed via screen sharing with the Mac Studio or MacBook.)
The assembly solution
The idea was to mount the Mini on the back wall of the lowboard. Where a large number of cables are hidden. Simply placing it on the floor behind the board would certainly work, but that didn’t seem very elegant to me. Especially since it would probably suck up a lot of dust on the floor. I don’t often get to it with the vacuum cleaner nozzle for basic cleaning. And ultimately the floor behind the board is occupied by various cables that are often moved back and forth. The mini shouldn’t be in the way. The back wall of the lowboard would be the ideal place.
When looking for a suitable holder, you come across all sorts of solutions in the relevant mail order shops, most of which are priced between around 10 and 20 euros. So nothing that breaks the bank. There are also more expensive solutions from brand manufacturers, which often have additional features such as locking mechanisms and anti-theft devices or special cable routing. None of this is necessary for my needs.
My requirement: The frame must be stable, well made (no sharp edges, padded surfaces) and the Mac should be easy to insert and remove. Ultimately, I decided on this no-name bracket called “Aiweiwa Metal Bracket Compatible with Mac Mini M4/ M4 Pro 2024 Wall/ VESA/ Under-Desk Bracket for Mac Mini M4” for 19.99 euros. Others would probably have done it too and I’m sure some readers will want to make corresponding recommendations. In any case, my choice turned out to be absolutely right because this holder meets the criteria mentioned.


installation
The Aiweiwa metal mount comes with various screws for different mounting points including VESA. There are also two better Velcro straps for additional fastening options. The metal frame can be fixed under the table, on walls or behind screens. Oh yes. As a little treat, a pen holder with a self-adhesive surface is also included in the scope of delivery. They could have saved themselves that, but so be it. Before it ends up in the plastic waste, I mounted it on the desk container as a holder for the Wuben X4 LED lamp.


The scope of delivery also includes some cut-to-shape foam rubber pads. These must be glued by the user to the inner surfaces of the holder, where they serve as scratch protection for the Mac housing. The pieces fit perfectly and can be installed in a minute, even for clumsy hands. Then assembly can begin. But first, a quick fit test: The Mac mini can be easily pushed into the holder and removed again without any fumbling or resistance.

To attach it to the back wall of the lowboard, I just have to pay attention to the alignment. The Mac later basically hangs with its lid on the back wall, while the bottom with the fan points outwards. The rear connections (HDMI, LAN, power…) should point to the right – when viewed from the armchair. Of course, the holder should not be attached so that the ports point downwards, as the Mac would then simply slip out of the holder. As I said: this solution has it no locking! I don’t need it either, otherwise I would have bought something else.


The short wood screws supplied are ideal for the wooden back wall of the lowbard. There was still a small imponderable here: I covered a large area of the back wall of the board with a special, self-adhesive anti-resonance mat called Reckhorn Alubutyl to acoustically quiet the rack. This “mat” is made of a type of bitumen that resembles thick, heavy, tough rubber and is finished with a type of thick aluminum foil. This insulation mat is actually designed for sound insulation in vehicles, but it also works excellently for the stated purpose. In particular, the usually thinner cabinet back walls and drawer bottoms can be easily “de-sounded” with pieces that are cut to size. My lowboard is very solidly made, but I have still calmed down various neuralgic points with this mat. Of course only in invisible areas.

Back to the holder. I dared to experiment, simply poked the screws through the mat at the desired position and screwed them into the wood. – Works perfectly. Although I wouldn’t put too much strain on the small screws in the non-solid back wall, the weight of the Mac mini plus a few cables pulling on it can easily withstand it.


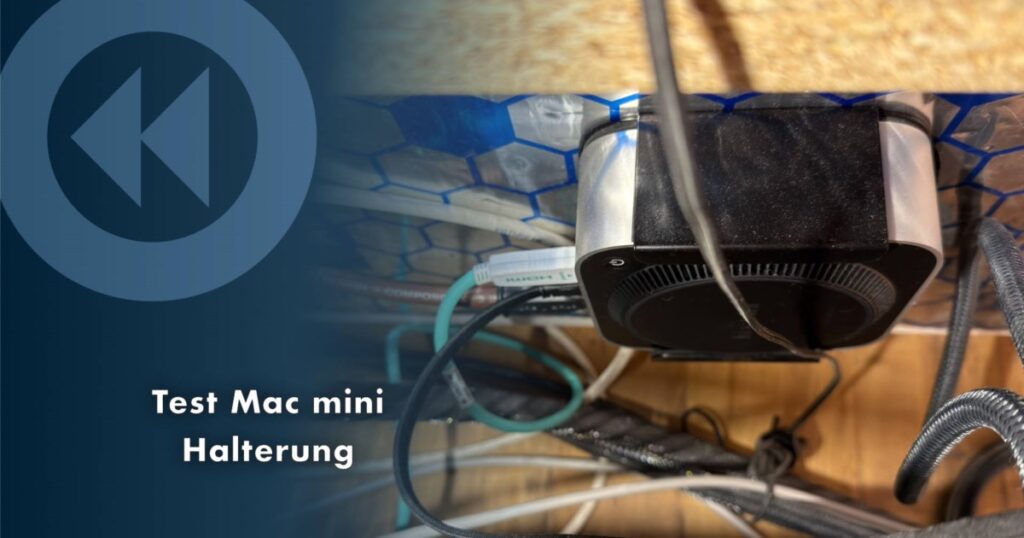
The Mac mini in its new working environment.
Now all you have to do is insert the Mac and it’s done. Connect the cable, boot and… wow! The mini now carries out its work in secret even more inconspicuously. The space freed up on the lowboard can be used a little more flexibly. For example, I need exactly the space previously occupied by the mini when using mono power amplifiers or other individual components for comparison purposes.
Conclusion: Simple and good
The Aiweiwa metal holder met my requirements perfectly. It’s just a simple holder and not rocket science, but the simple things in life can bring joy. The product is cleanly processed, very solid, comes with all the necessary assembly materials and doesn’t cost the earth. Therefore thumbs up. And my recommendation for anyone who has a similar application requirement for their Mac mini.
Only those who need brackets with, for example, integrated anti-theft protection or locks to prevent them from slipping out (e.g. if the connection side should face downwards) would have to look elsewhere. An example is the MacCuff mini from Sonnet.