

A Memory Baked in Chocolate: My Wife’s Favorite Dessert
The smell of melting chocolate is currently filling every corner of our kitchen, a warm, inviting cloud that even Pretzel is investigating with an intensity usually reserved for squirrels. Today, we’re not just baking; we’re resurrecting a memory, a molten masterpiece that always reminds me of my wife’s favorite dessert: the humble, yet utterly show-stopping, chocolate lava cake.
I remember the first time I saw her eyes light up over one of these. It wasn’t in some fancy restaurant, but a cozy bistro in Charleston, years ago. The air was thick with the scent of salty marsh and jasmine, and the soft murmur of conversation blended with the clinking of silverware. She had ordered it almost on a whim, a small indulgence after a long day exploring the historic streets. When it arrived, a dark, unassuming mound on a white plate, I watched her carefully break into the side with her spoon. The moment the warm, liquid chocolate spilled out, glistening like a secret river, her smile was immediate and genuine. That smile, folks, is etched in my brain more clearly than any technical diagram I’ve ever designed for Accenture. It was a pure, unadulterated moment of joy, a small, perfect explosion of happiness that I’ve since made it my mission to replicate in our own kitchen, often while Sebastian is building an elaborate LEGO castle in the background, entirely unfazed by the imminent sugar rush.
For me, baking has always been a bit like building a complex n8n workflow – a series of precise steps, specific inputs, and expected outputs. But with baking, the output is a lot more forgiving if you make a tiny error, and the feedback loop (eating it) is infinitely more satisfying. There’s a particular satisfaction in taking simple ingredients and, through careful orchestration, transforming them into something truly special. And a chocolate lava cake? That’s special with a capital ‘S’. It’s about creating that moment, that unexpected gush of warmth and richness, that makes it more than just a dessert; it becomes an experience. Every time I make this, I’m not just following a recipe; I’m chasing that memory, that specific Charleston evening, and the quiet satisfaction of seeing that same joyful anticipation in my family’s eyes.
The Magic Behind the Molten Core: Ingredients That Matter
So, what makes a chocolate lava cake tick? It’s not some arcane alchemy, just a clever play of classic baking ingredients that are readily available. At its core, you’ve got dark chocolate, good quality butter, fresh eggs, granulated sugar, and a touch of all-purpose flour. Each component plays a crucial role in achieving that specific, almost magical texture: a delicate, lightly set cake with a thin, tender crust, encasing a warm, flowing, molten chocolate center.
Let’s start with the star: dark chocolate. I’m talking about a good quality chocolate, something in the 60-70% cacao range. Don’t skimp here; the chocolate is the flavor engine. The high cacao content means less sugar from the chocolate itself, allowing us to control the sweetness with the granulated sugar. When melted with butter, it creates the rich, foundational liquid that will become our molten core. The fats in the butter help carry the chocolate flavor beautifully and contribute to that silky mouthfeel.
Next, the eggs. Oh, the humble egg, doing so much heavy lifting here! We’re using both whole eggs and extra yolks. The whole eggs provide structure and aeration, giving the cake its initial lift and delicate crumb. The extra egg yolks? They are the secret weapon for richness and that creamy, almost custard-like texture in the molten center. They also help to prevent the cake from becoming too dry, ensuring that moist interior. Without them, you’d have a much drier, more uniformly baked cake, rather than the contrasting textures we’re aiming for.
Sugar, specifically granulated sugar, does more than just sweeten. It interacts with the eggs and flour to control gluten development and moisture retention. In this particular cake, it helps achieve that specific light browning on the exterior and contributes to the tenderness of the crust. And finally, a minimal amount of all-purpose flour. This is critical. Too much flour, and you get a regular chocolate cake. We use just enough to provide a whisper of structure to the outer shell, allowing the edges to set and form that delicate crust, while the center remains gloriously liquid. It’s like adding just enough rebar to a concrete slab to give it integrity without making it heavy or inflexible.
When these elements are combined and baked just right, the magic happens. The edges of the cake, with their higher concentration of flour and egg proteins, set first, forming a stable perimeter. The heat then gradually works its way inwards. Because the baking time is relatively short and the oven temperature high, the interior, rich with melted chocolate and egg yolks, doesn’t have enough time to fully coagulate and set before the exterior is done. The result is a cake that holds its shape, but collapses to release its warm, flowing core the moment you break through that tender outer layer. It’s a dance of heat, fats, and proteins, perfectly choreographed.
Now, a quick substitution tip from your friendly neighborhood dad: If you find yourself without dark chocolate and only have semi-sweet chips on hand, you can absolutely use them. Just reduce the granulated sugar by about a quarter, because semi-sweet chips already pack a good bit more sugar. But don’t tell my German grandmother I told you to do that; she believes in precise measurements and the right ingredients, always. She’d probably send me a stern email, translated from German, via carrier pigeon.
Mastering the Melt: Technique and Temperature
Baking a chocolate lava cake isn’t about brute force; it’s about finessing the heat and understanding the science. It’s a precise operation, much like tuning a server rack, where every degree and every minute counts.
Pro-Tip for the Oven:
Always preheat your oven for at least 20-30 minutes *after* it says it’s reached temperature. Oven thermostats can lie, and an accurately preheated oven is your best friend for getting that perfect molten center. Use an oven thermometer if you have one. Consistency is key.
High Temperature, Short Bake
We bake these cakes at a relatively high temperature – usually around 400°F (200°C) – for a surprisingly short amount of time, typically 12-15 minutes, depending on the size of your ramekins. Why this temp? The intense heat quickly sets the exterior of the cake, forming that structural crust, before the interior has a chance to fully cook through. It’s a race against time, where the goal is to have the edges firm and the center barely set, ready to liquefy upon serving. If the temperature is too low, the cake bakes slower, giving the center more time to solidify, and you end up with a fudgy cake, not a molten one. Delicious, yes, but not a lava cake.
Chilling the Dough (or batter, technically)
While not always mandated in every recipe, chilling your lava cake batter for at least 30 minutes, or even overnight, is a game-changer. Why bother? There are a couple of good reasons. First, chilling allows the flavors to meld and deepen. Think of it like a good stew; it always tastes better the next day. Second, and crucially for texture, chilling firms up the butter in the batter. When this cold batter hits a hot oven, it creates a greater temperature contrast. This means the exterior has more time to firm up and achieve that lovely, delicate crust before the intense heat can fully penetrate and cook the very center. It slows down the internal cooking just enough to ensure that molten surprise. Plus, it gives you flexibility; you can prep ahead and bake fresh when company arrives, which is always a win in my book when managing Sebastian’s unpredictable evening schedule.
Common Pitfalls to Avoid
- Overbaking: This is the cardinal sin of lava cakes. If you bake it too long, you’ll end up with a fully cooked, dense chocolate cake. The edges should be set, but the center should still look a bit wobbly when you gently shake the ramekin. When in doubt, err on the side of underbaking.
- Under-greasing Ramekins: Nothing is more frustrating than a perfectly baked lava cake that sticks to the ramekin. Generously butter and flour your ramekins. You can also use cocoa powder instead of flour for an even darker exterior and richer flavor profile.
- Not Enough Chocolate: Use good quality chocolate, as mentioned. Subpar chocolate will lead to a bland cake. This isn’t the place to use those old chips from the back of the pantry that tasted questionable even when fresh.
- Opening the Oven Door: Resist the urge! Every time you open the oven, you drop the internal temperature, which can disrupt the delicate balance of baking and lead to sunken or uneven cakes. Trust the timer and your wobbly-center test.
- Serving Too Cold: While they’re perfectly fine at room temperature, a lava cake truly shines when served warm, straight from the oven. That’s when the “lava” is at its best, gloriously liquid and inviting.
The Hero Shot: A Masterpiece Unveiled
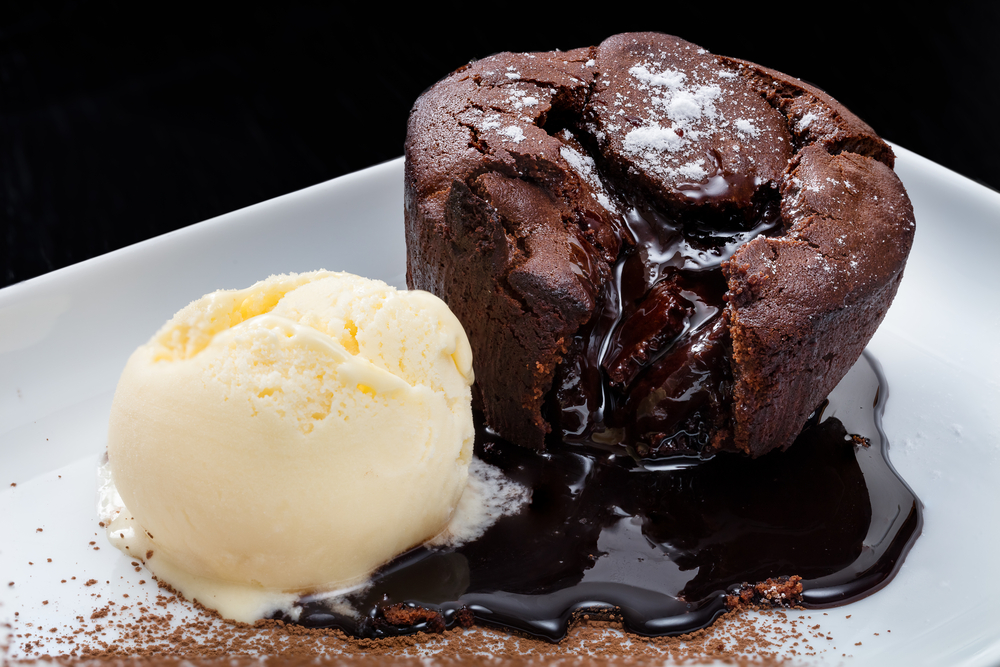
Alright, folks, let’s talk about the final act, the moment of truth captured so perfectly in the photograph. This isn’t just a cake; it’s a statement. The visual composition, with its emphasis on contrasting textures and temperatures, really invites you into a sensory experience that highlights both decadence and classic comfort. It’s truly an exquisitely captured moment of pure indulgence.
Look at it closely. The cake’s outer crust presents a rich, deep chocolate hue, graduating from a dark, almost charcoal-brown at its base to a slightly lighter, warmer cocoa-brown on its upper surface. This gradient isn’t just pretty; it tells a story of how the cake baked, with the heat working its way up and around the sides. The texture of this crust is exactly what we want: delicate and tender, showing subtle ripples and a soft, matte finish that hints at a moist interior. It yields readily to the flowing molten center rather than presenting a crisp or hard shell. That tenderness is a direct result of the precise balance of flour, fat, and egg, and the careful baking time.
And then, the rupture. That dramatic reveal, where the cake is broken to show its glistening, liquid heart. It’s a chocolate waterfall, pure and unadulterated, beckoning you in. This warm, flowing molten chocolate center is the absolute star of the show, a direct payoff for all that careful technique. The contrast with the smooth, comforting scoop of vanilla ice cream isn’t just aesthetic; it’s a genius stroke of flavor genius. The cool, creamy vanilla provides a perfect counterpoint to the intense, warm chocolate, cleansing the palate and inviting another spoonful. It’s a classic pairing for a reason, a comforting embrace for the rich decadence.
How do you achieve that specific shade of golden-brown on the upper surface, that warmer cocoa-brown? It comes down to those last few minutes in the oven and the sugar content. The sugar in the batter caramelizes slightly on the surface, encouraged by the high heat. As the cake rises and expands, the top receives direct, intense heat, leading to that lovely, slightly lighter brown, while the sides, especially those closer to the ramekin base, retain their deeper, almost charcoal-brown shade from the direct contact with the hot metal and concentrated chocolate. This is why not overbaking is so crucial; you want just enough surface browning without drying out the interior or toughening that delicate crust.
Storage & Reheating for Day Two Magic
Let’s be real, a chocolate lava cake is at its absolute best fresh from the oven, when the “lava” is truly molten. But life happens, and sometimes you have leftovers. Don’t despair!
If you have unbaked batter, store it covered in the fridge for up to 2-3 days. This actually enhances the flavors and ensures a better molten center, as we discussed. Just make sure to bring it closer to room temperature for about 15-20 minutes before baking, or add a minute or two to the baking time if baking from fully chilled.
For baked cakes, you can store them in an airtight container at room temperature for a day, or in the fridge for up to 3 days. When you’re ready to re-experience the magic, the goal is to gently warm it without fully cooking the center. My go-to method is a quick blast in the microwave: heat for 15-20 seconds on medium power, check, then continue in 10-second intervals until the center is warm and just beginning to soften again. You won’t get the same dramatic gush as fresh, but you’ll still have a lovely warm, fudgy center that’s utterly satisfying. Alternatively, you can pop it into a preheated oven at 300°F (150°C) for 5-7 minutes, until warmed through. Just be careful not to overheat!
Till Next Time, Happy Baking!
And there you have it, folks, my absolute favorite recipe for chocolate lava cake. It’s more than just a dessert; it’s a little bit of science, a lot of love, and a guaranteed way to bring a smile to someone’s face – especially my wife’s. From that rich, deep chocolate hue of the delicate and tender crust to the glistening, liquid heart, this cake is pure comfort in every bite. Even Pretzel, who is currently patrolling the floor for stray bits of cocoa powder that might have escaped my careful transfer to the ramekins, seems to understand the gravitational pull of a good chocolate smell. He’s got that focused, Border Collie stare, making sure no crumb goes un-investigated.
Baking, for me, is a way to connect, to create something tangible and delicious in a world that often feels very digital. It’s about bringing people together around the kitchen island, sharing stories, and making memories. So, I encourage you to try this recipe. Embrace the warmth, savor the molten chocolate, and make a memory of your own.
Now, I’m curious. We’ve talked about a Charleston memory, but food often takes us to amazing places. What’s *your* favorite food memory from a trip, big or small? Tell me all about it in the comments below!
Woof!
Michael & Pretzel