


If you’ve used API Catalog to integrate MuleSoft APIs with Agentforce, you already know the value of having a governed, centralized catalog of enterprise APIs available to your agents. Now, with Model Context Protocol (MCP) server support in API Catalog, you can extend that same experience to the open standard that AI agents across the industry are adopting. MCP gives agents a universal way to discover and call external tools and with API Catalog, Agentforce Agents can now call these MCP Servers.
This guide walks you through the complete setup: from syncing your MuleSoft MCP servers into API Catalog, to creating secure connections, allowlisting tools, and activating agent actions so your Agentforce agents can use them. By the end, you’ll have a working MCP server that Agentforce can discover and call – with full enterprise-grade security in place.
What you need before you start
Before diving into the setup, make sure you have the following in place. Missing any of these prerequisites is the most common reason developers get stuck during configuration.
Salesforce org requirements:
- A Salesforce org with Lightning Experience enabled (Developer, Enterprise, Performance, or Unlimited Edition)
- API Catalog feature enabled in your org – navigate to Setup > API Catalog to confirm
- System Administrator permissions, or a custom permission set that includes API Catalog management access
MuleSoft requirements:
- An Anypoint Platform organization with at least one deployed MCP server
- Organization Administrator or API Manager permissions in Anypoint Platform
- A tenant relationship established between your Anypoint Platform organization and your Salesforce org – this is the trust bridge that enables sync
MCP server requirements:
- Your MuleSoft MCP server must be deployed to CloudHub 2.0
- The server must have a consumer endpoint configured in Anypoint API Manager with a valid HTTPS URL
How to sync MuleSoft MCP servers into API Catalog
With prerequisites in place, you’re ready to bring your MuleSoft MCP servers into Salesforce. The sync process connects API Catalog to your Anypoint Platform organization and automatically detects eligible MCP servers.
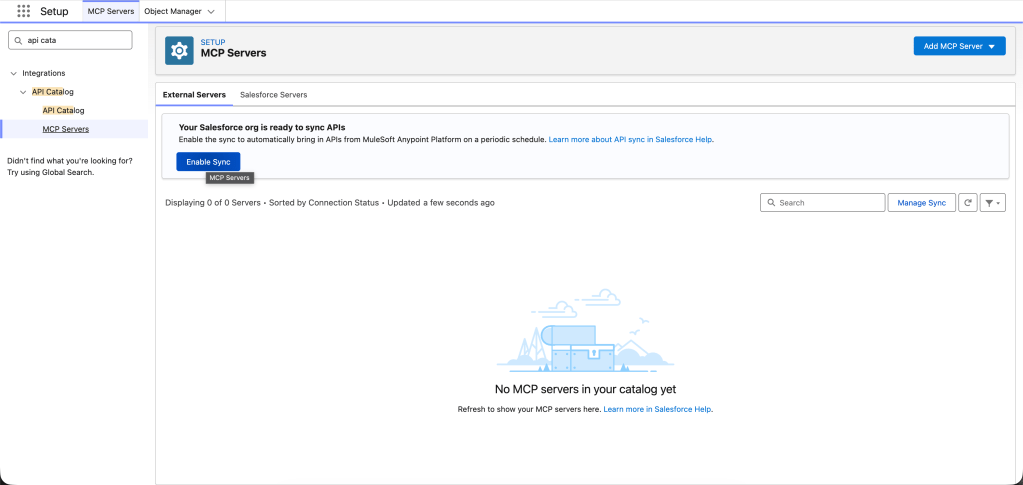
Step 1: Enable sync
- In Salesforce, navigate to Setup > API Catalog > MCP Servers
- Click the External Servers tab
- Click Enable Sync
This initiates the connection between API Catalog and your Anypoint Platform organization. The initial sync runs in the background and may take a few minutes to complete.

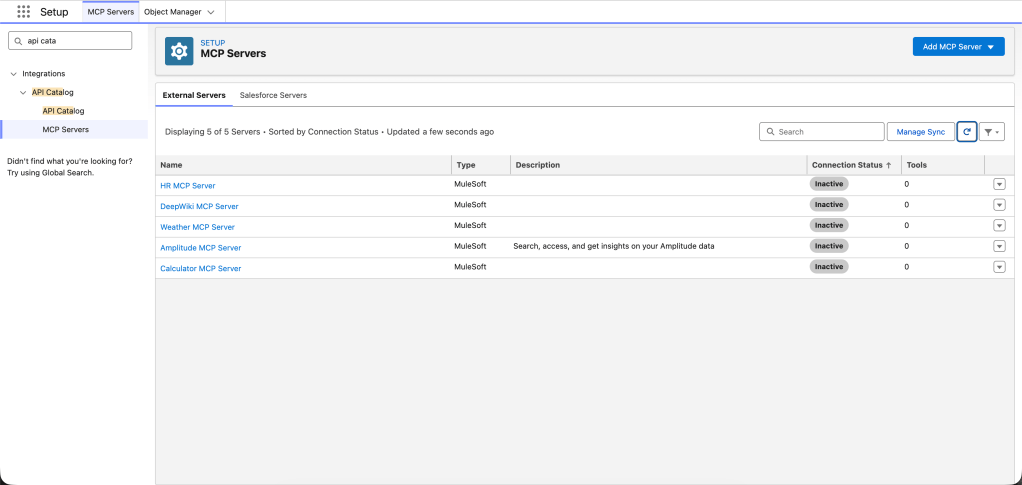
Step 2: Verify your synced servers
Once the sync completes, your MuleSoft MCP servers appear under the External Servers tab. For each server, you’ll see:
- Server name pulled from your Anypoint Platform configuration
- Description: The description you defined in Anypoint Platform
- Source: Shows “MuleSoft” to distinguish from manually registered servers
- Connection status indicates whether a secure connection has been established

If a server you expected doesn’t appear, check the following:
- The server has a consumer endpoint configured in Anypoint API Manager
- The consumer endpoint URL uses HTTPS
- The tenant relationship between Anypoint Platform and your Salesforce org is active
Step 3: Keep your catalog current
After the initial sync, API Catalog automatically syncs on a recurring schedule. When you add, update, or remove MCP servers in Anypoint Platform, those changes propagate to API Catalog automatically.
If you’ve just published a new MCP server and don’t want to wait for the next scheduled sync, click Manage Sync and trigger a manual refresh. This is especially useful during development when you’re iterating on tool definitions. Now that your servers are visible in API Catalog, the next step is establishing secure connections so Agentforce can actually reach them.
How to create connections and allowlist tools
Syncing makes your MCP servers visible in API Catalog, but Agentforce can’t use them until you create a connection and explicitly approve which tools to expose. This two-step process – connect, then allowlist – is what gives you fine-grained control over your agentic tools.
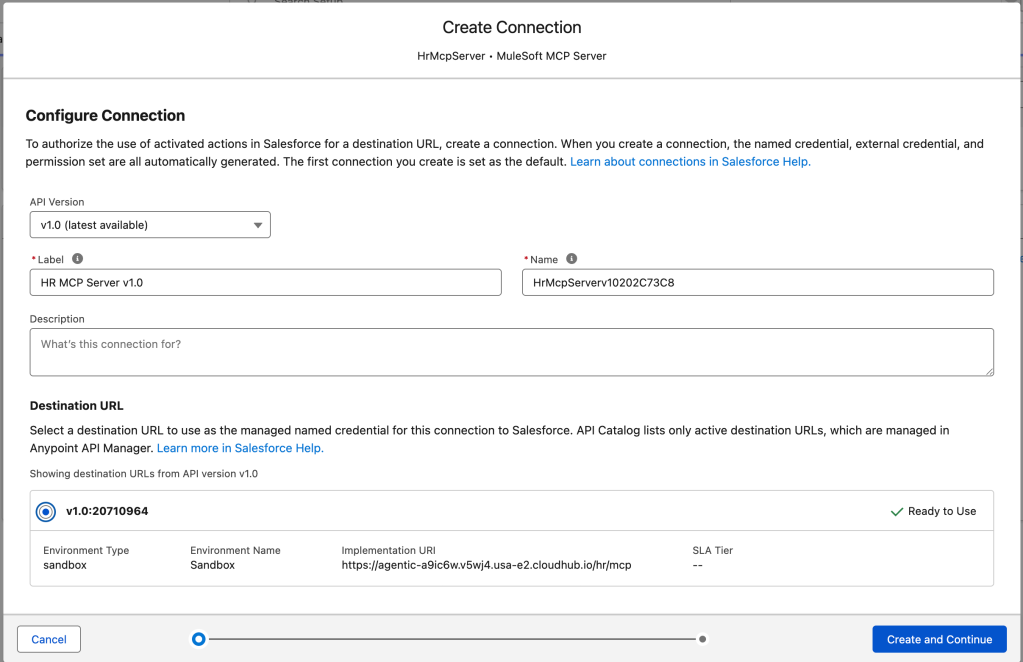
Step 4: Create a new connection
- From the External Servers tab, click on the MCP server you want to connect
- On the server detail page, click New Connection
- Select the destination URL – this becomes the managed named credential that Agentforce MCP Client uses to reach your server

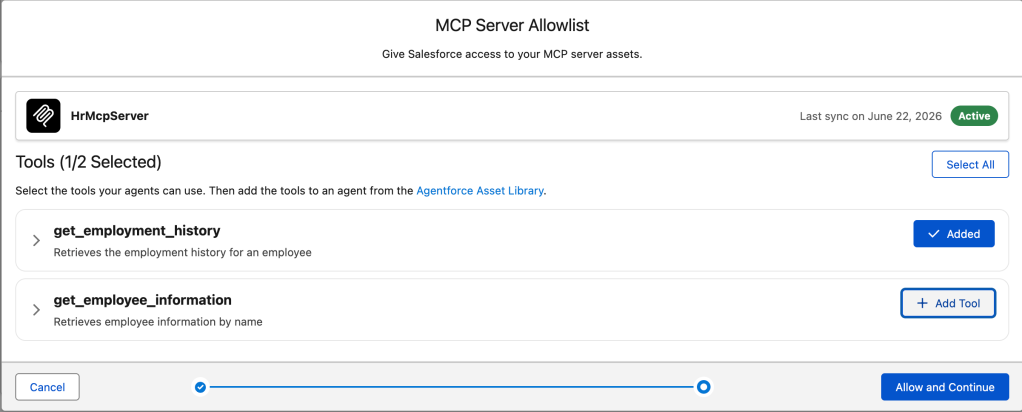
Step 5: Allowlist tools
Once your connection is validated, API Catalog prompts you to select which tools to expose to Agentforce. This is the governance step – only the tools you explicitly approve become available.
- Review the list of tools detected on the MCP server
- For each tool, you can click to inspect the input schema – this shows you exactly what parameters the tool accepts and what it returns
- Select the tools you want to allowlist
- Click Save
A few things to keep in mind:
- You can add or remove tools at any time from the server details page
- Tools that are actively referenced by agent actions can’t be removed until those references are cleared
- Best practice: keep your tool count around 20 per server – too many tools and the AI model struggles to select the right one

Once your tools are allowlisted, they’re automatically available in the Agentforce Asset Library as agent actions – no separate activation step required. You can add or remove allowlisted tools at any time from the server details page in API Catalog, and the Asset Library reflects those changes.
How to verify your setup in Agentforce
With your tools allowlisted, you’ll want to confirm that everything works end to end. Here’s how to verify your setup.
Check tool availability in Agentforce
- Navigate to Setup > Agentforce > Asset Library
- Search for the tools from your MCP server
- Verify that each allowlisted tool appears as an agent action with its name, description, and input schema
Test with an agent action
- Open Agent Builder and create or edit an agent
- Add a new action that references one of your MCP tools
- Test the action using the agent preview – provide sample input and confirm you get the expected response
Troubleshooting common issues
Here are the issues developers most commonly run into during setup, along with how to resolve them.
Server doesn’t appear after sync
- Verify the tenant relationship is active between Anypoint Platform and your Salesforce org
- Confirm the MCP server has a consumer endpoint with a valid HTTPS URL in Anypoint API Manager
- Try a manual sync: click Manage Sync in API Catalog and trigger a refresh
Connection fails during authentication
- For Client ID enforcement: check that your Anypoint Platform client credentials are valid and haven’t expired
- For OAuth 2.0: verify the identity provider URL is correct and that the client secret matches
- Check that your Salesforce org can reach the MCP server’s HTTPS endpoint (no firewall or network restrictions)
Tools don’t appear in Agentforce Asset Library
- Check that at least one tool is allowlisted – a connected server with no allowlisted tools won’t surface anything
- Verify the connection status shows as Connected in API Catalog
- Verify you have the necessary permissions to view agent actions in the Asset Library
Agent actions fail at runtime
- Test the MCP server directly to isolate whether the issue is with the server or the Agentforce configuration
- Check the named credential associated with the connection – credentials can expire or become invalid
- Review the tool’s input schema to ensure the agent is passing parameters in the expected format
Ready to bring your MuleSoft MCP servers to Agentforce?
You now have a complete MuleSoft MCP server connected and governed in API Catalog, with allowlisted tools available as agent actions in Agentforce. Now it’s time to put it to work. Sync your first server, allowlist a focused set of tools, and start building agents that take real action across your enterprise systems. To learn more, review the help column: Get Started With MuleSoft MCP Servers in API Catalog.