
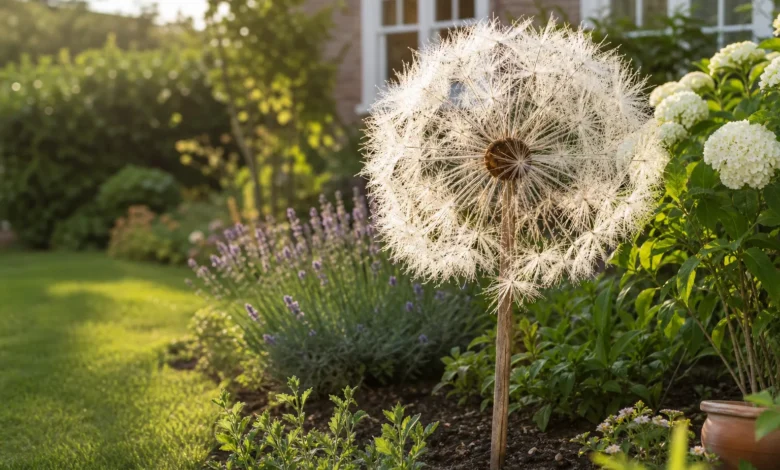

One XXL dandelion for the garden is the kind of decoration that every visitor stops for a moment. While the real dandelion only measures a few centimeters, here you can bring a delicate ball of 50 centimeters or more into the bed – and all of this made from materials that are mostly already in the craft box. In these instructions you will get the complete material list, three clearly numbered work steps, an extra section on weatherproofing and the typical mistakes that cause most projects to fail.
The principle is surprisingly simple: thin rods as seeds, white fringes as umbrellas, a ball as the flower base, a branch as the stem. The appeal lies in the details – in the density, the different lengths and a location that makes the ball glow in the backlight.
What you need: Material list at a glance
Before you get started, it’s worth taking a look at the complete list. Nothing is more annoying than discovering that the ball is missing in the middle of gluing.
- Thin wooden sticks or shish kebab skewers – they become individual seeds. Be generous, a dense ball will quickly swallow 60 to 100 pieces.
- Brown acrylic paint to color the tips, plus a small container and some water to dilute.
- White Christmas garland or white crepe ribbon for the fluffy umbrellas.
- Styrofoam or foam ball as a flower base into which all the sticks are inserted.
- A long, natural branch or a bamboo stick as a stem.
- Hot glue gun, scissors and optional green or beige color for the branch.
The costs remain manageable. Branches can be found in your own garden, Styrofoam leftovers and old garlands are often still lying around from Christmas, and shish kebab skewers cost almost nothing. If you buy everything new, you can usually get by with a single-digit amount per dandelion at the craft store – one reason why this decoration made from simple, existing materials is so popular.

Step 1: Prepare the seeds
Each seed of the real dandelion has a brown end and a white umbrella – that’s exactly what you’re building now. Lightly dilute the brown acrylic paint with water and dip one tip of each stick about two to three centimeters deep. Lay the sticks out to dry. If you’re in a hurry, use a hairdryer to help; That saves a good quarter of an hour of waiting time.
Once the paint is dry, it’s time to move to the opposite, uncolored end. Glue the umbrella here. At the Christmas garland cut short pieces and secure them with a dab of hot glue. At the Masking tape cut a strip lengthways into fine fringes – a trick from the editors: place several layers on top of each other and cut in one go, this halves the work. The more layers, the bushier and fuller each individual seed will appear later.
A word about safety: When gluing, your fingers come close to the hot nozzle. It is better to hold the tiny tufts of fringe with tweezers or the end of the rod rather than directly with your fingertips. If something goes wrong, our guide will help you on how to safely remove hot glue residue.

Step 2: Equip the ball
Now the actual shape is created. Place the finished seeds as evenly and tightly as possible into the Styrofoam ball. Dense is the key word here: a gapped assembly quickly appears bare and puny from a distance, while a dense ball looks like a real, bulging dandelion.
Insert the branch as a stem early, ideally before the ball is full all around. This way you have something to hold on to when loading and you don’t end up breaking the finished rods yourself. Beforehand, sharpen the end of the branch slightly with a knife so that it slides more cleanly into the foam.
The most beautiful effect comes from deliberate irregularity. Use different rod lengths and plant some seeds slightly at an angle rather than strictly radially. This makes the ball look as if a breeze had just tugged at it – alive instead of punched.

Step 3: Assemble the stems and weatherproof them
If the branch sits firmly in the ball, the basic shape is finished. If you like, you can paint the stem green or brownish-beige – but a natural branch often looks the most authentic and can stay that way.
And here comes the point that most instructions leave out: the Weather resistance. Paper and plastic fibers yellow and clump together outdoors over time. A fine coating of matt clear varnish or boat varnish from a spray can protects the fringes without sticking them and noticeably extends their durability. Spray in thin layers from a distance of around 30 centimeters – it’s better to do it twice lightly than once full, otherwise the fine fibers will stick together.
The second lever is location. A dandelion that gets some wind protection – on a hedge, wall or between taller perennials – will last significantly longer than one that is freely exposed to any storm. It’s best to put the decorations away in a dry place for the winter anyway.
Where to put the XXL dandelion? The most beautiful locations
The effect depends on the space. These places work particularly well:
- Between ornamental grasseswhere the filigree ball and the fine stalks visually complement each other.
- In the perennial bedas a bright resting point between strong flowers.
- Along a garden pathwhere the dandelion leads the eye.
- Free on the lawnso that the round silhouette comes into its own.
- In the front yard as a friendly welcome.
- In large planters on the terrace or balcony if there is no bed available.
The strongest trick: several copies in different heights group. A small, a medium and a tall dandelion next to each other look like a naturally grown tufa and much more lively than a single piece. If you want more, you’ll find plenty of supplies for the whole season in our 70 other DIY garden decoration ideas.

What’s Hot
DIY decoration
Making lavender baskets: instructions for summer decorations
Avoid common mistakes
Experience shows that these are the places where things go wrong – and all of them can be easily avoided:
- Too loosely stocked. Don’t skimp on bars. A half-empty ball immediately reveals the craft character; the density creates the illusion.
- Still wet paint smeared. If you don’t let the brown tips dry completely, you’ll quickly end up with streaks on the white umbrellas. Patience or hairdryer.
- No sealing. Without protective varnish, the garland will yellow after the first rainy weekend – the half hour of spraying is worth it.
- All rods are the same length and exactly radial. That looks artificial. Only the variation in length and angle creates the natural wind effect.
If you keep these four points in mind, the dandelion will succeed on the first try. And if you enjoy delicate DIY projects, perhaps a DIY fairy garden is your next weekend project.
Frequently asked questions
How big should an XXL dandelion be at least for the garden?
From around 50 centimeters in diameter, the ball develops its full effect and stands out clearly from real plants. It can be smaller, but then it loses the characteristic “wow” effect from a distance. For beds with tall perennials it can be 60 to 70 centimeters.
How long does a homemade dandelion last outside in the wind and rain?
If left unsealed, it usually only lasts a few weeks because the fibers absorb moisture and turn yellow. With a layer of matt clear varnish and a location protected from the wind, it will last through an entire gardening season. You should store them dry over the winter.
Christmas garland or masking tape – which is better for the seeds?
The Christmas garland looks fluffier and finer and is visually closer to the real dandelion, but is a little more fiddly to process. Masking tape is cheaper, can be cut into fringes more quickly and can be designed very fully in several layers. For a particularly realistic result, many people turn to garland.
Can you make the XXL dandelion without hot glue?
Yes. Instead of gluing, you can wrap the fringes at the end of the rod using thin wire or fine raffia thread. This takes longer, but does not require a hot device and is therefore also suitable for children who want to help with crafts.